How to Boot Asus Laptop from USB | Boot Menu Key for F550 Series
")
How to Boot Asus Laptop from USB | Boot Menu Key
Hello! Guys today I am exactly going to show you how to boot Asus F550C series Laptop from a Windows Bootable USB Drive or Pendrive to Install Windows 7, 8, 10 or Windows 11. The general Asus laptop comes with pre-installed dos or windows 10, But if you want to reinstall a custom or fresh Windows 10 or 11 Operating System or if you like to install older versions of Windows like 7 or 8. Operating systems like Linux, and Ubuntu can be also done as well.
So, if you are trying to boot your laptop with USB and you see there is not any boot option. Even the bootable USB is plugged into the USB port of Laptop and do not recognize. The first thing you have to do, enable the boot option by changing few settings in the bios setup.
To boot from USB or DVD also you need to know, What is the Asus laptop boot menu key as well. In this article, I will show you exactly how to do such things. You can also install, Mac or Linux with the same.
In default mode, you can’t be able to see the boot from USB or DVD option in the boot menu. That means you have to enter the bios setup and enable them, to enter the setup you have to open the boot menu first. The Asus boot menu key in this laptop is the ESC button which you have to press right after turning on your laptop by using the power button.
Follow the steps to go further, Benefits of custom OS, you can install fresh windows according to your desirable partition sizes. If you have a 750GB Hard or 1TB Drive, you can make C: Drive of 250GB and the rest of the space as a D: Drive. Let’s follow the below steps and boot the Asus laptop from USB.
How to Boot Asus Laptop From USB (Step by Step)
Step 1: Plug a Bootable USB Drive into your Laptop.
Note: Skip this Step If you Want to Install Windows from DVD ROM.
Step 2: Turn on your Laptop and press the ESC key 5-10 times quickly to open the Boot menu.
Step 3: You will see an empty boot menu with the “Enter Setup” option, select it and hit enter.
Step 4: Once you have entered Bios Setup, Go to Advanced Tab by pressing Right Arrow Key.
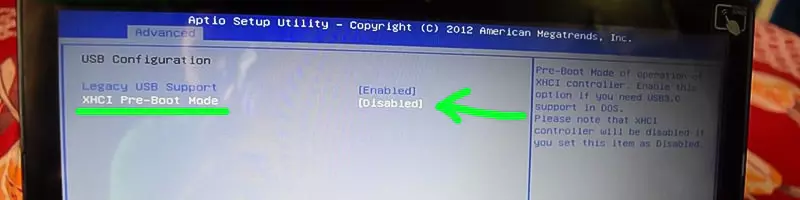
Step 5: In the Advanced tab enter the “USB Configuration”, Now go to “XHCI Pre-Boot Mode” and Disable it.
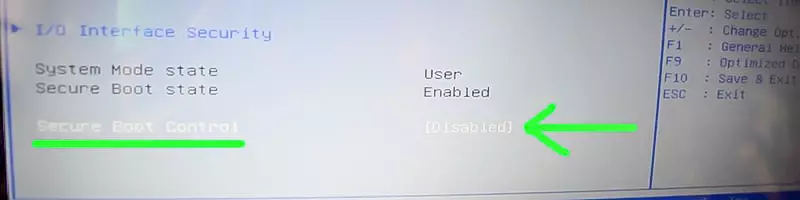
Step 6: Now go to Security Tab and Disable the Secure Boot Control option.
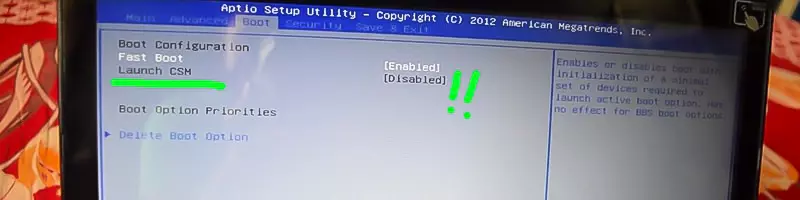
Step 7: Next, Enable “Launch CSM” in the Boot Tab, But here you can’t get the option to Enable.
Step 8: To get the option to Enable Launch CSM Press “F10” and select “Yes” to Save Configuration and Exit.
Note: This will save all the settings you have made in bios and will restart.
Step 9: Now Quickly press ESC Key 5-10 times and again Enter Bios Setup.
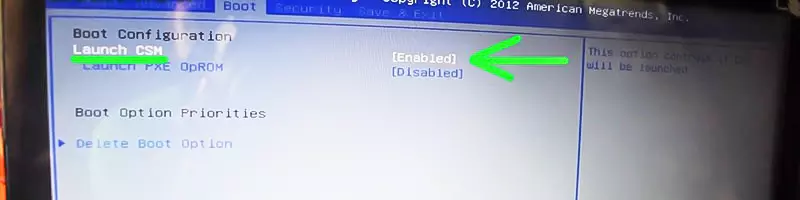
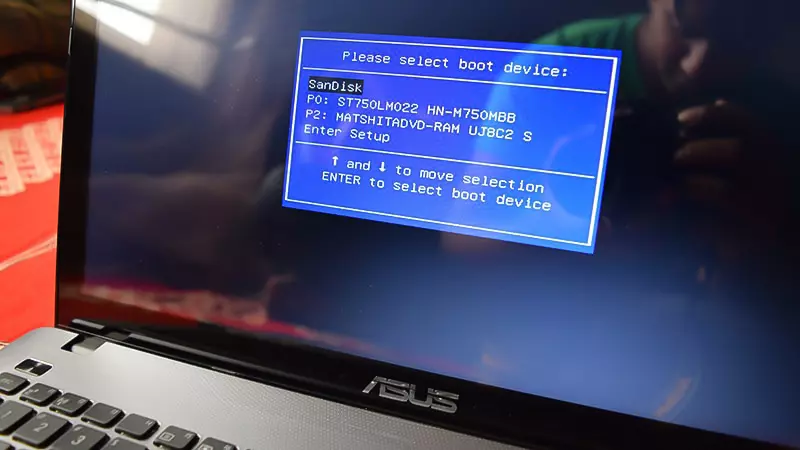
Step 10: Now go to the Boot tab you will find Launch CSM option is available, just enable it and again hit F10 Button to Save and Exit. While the laptop is restarting Quickly press the ESC key 5-10 Times to Open the Boot Menu again. Now you will see the boot menu like the picture below.
Congratulations !! Now you Successfully enabled the Boot option for your Laptop. You can now install Windows 10 or 11 from your Bootable USB Drive or from DVD Drive. If you want to see a dedicated video of all these processes or if you still want to know how to make a bootable USB drive check the videos embedded below after this Ad.
How to Boot Asus Laptop From USB (Video Tutorial)
Thanks for reading How to Boot Asus Laptop From USB drive, hope you know the correct Asus boot menu key as well. This article may be related to these Searches: Asus x54c boot menu, Asus x540s boot from USB, Asus x540s enter bios, Asus x540s boot menu key, Asus x540s bios, Asus k52f boot menu, Asus k52f boot from USB, Asus x551c bios, Asus x54c boot menu, Asus f550 boot from USB Etc !!
Old ASUS got stuck in a restart loop at 64% on Win10 install, and the Escape key tip was the only thing I found that could break it. THANK YOU. #Esc!F8
This has worked for me on an ASUS VivoBook, thank you so very much
You are welcome 🙂
¡Buen día Aamir!
A mi me ha servido mucho tu aportación.
¡Gracias!
You are welcome 🙂
thanx it really helped
You are welcome 🙂
Thank you very much. Very usefull information.
My Ubuntu 18.04 has crashed. I am trying to save it by booting rescatux 0.73 into my Asus laptop x555q. I have found no directions on the web. Can you help me?
Hello i have tried to Boot my Asus Laptop From USB Bootable Drive (X550CA) using Windows 8.1 OS applying the method you disclosed, when it get to the windows logo, it freezes. i have tried to use a diffiferent OS but it freezes.
What should I do????
I’m facing an issue while loading windows 7 in asus laptop. Can anyone help me it’s urgent
Thanks! It would have taken ages for me to figure that out 😛 take care!
A complete detailed content
Thank you for your help
Google should move Your solution to the top. Quick and helpful, Thank You.
thx bro, its works
Thanks a lot fam! very helpful.
Thank you so much!
Welcome 😊
thanks man. worked like a charm..
Welcome, thanks for visiting 🙂
very good thing
Thanks for visiting 🙂
Very helpful. Thank you sir.
I’ve been using Ubuntu and Windows on my Asus laptop for 4 month, and both work fine.
You’re the man who made this possible, thank you so much!
I just want to share my own experience on configuration problems, which I came into and which are not covered in the article.
1. There are 2 modes an operating system can be installed in: BIOS (Legacy) and UEFI. You have to install both your OSes in the same mode! On Windows there is a way to lookup which one it is installed in. When loading Ubuntu from USB, you’re provided with both options; just choose the mode in which you have your Windows installation.
Note: If you load Ubuntu in the different mode, it’s not going to recognize your Windows installation.
2. Despite the fact Ubuntu DID recognize Windows, it did NOT suggest me to install itself alongside it. I had to do it manually: allocate a partition on the space shrinked for Ubuntu and tell it to make installation exactly on this partition. And here is one more thing: I couldn’t allocate more than 4 partitions on my drive (neither Windows Disk Manager not Ubuntu installer could do that), so I had to leave my Windows with 3 partitions in order to allocate one more for Ubuntu.
Hope these helps for someone facing the same issues.
Thx for your help
This is a very detailed and complete guide. I followed these steps when configured my BIOS and successfully installed Ubuntu on my Asus. Thank you so much for your work!
You are most welcome 🙂
Bhai Mera Asus A555L laptop he usme administrator account wale ka password bhul gaya hu our ab me app konsa bhi install karta hu to administer account ka password puch ta he our wo muje malum nahe he please help me
thank so alot
welcome
Big thanks man!
most welcome 🙂
Thank you guys. It’s work successfully
I can’t disable XHCI Pre-Boot Mode (I have only Enabled and Smart Auto options), and I don’t have the Secure Boot Control under the Security tab. I also don’t have the Launch CSM in the the Boot Tab (only UEFI Book and Launch PXE OpROM).
Am I missing something? can you please advise?
thanks bro
welcome
i’ve disabled secure boot but still can’t find launch csm! my laptop is asus x441n
Thanks a lot
Thank you so much
HI i dont have lunch CSM i dont know where is it
thanks for advice.
thankyou Very much. this has been very helpful to me. Am grateful. thankyou. it worked perfectly
Hi YouTuber! 🙂 where download windows 7 to USB thank you a You is Best YouTuber 😉
Some of the keys on my Asus keyboard is working, I replaced the keyboard, for a wile I start getting the same problem, I think is windows, I enter bios the same problem. pled help me.
I think you need to change your internal keyboard, one thing you can do unplug the internal keyboard an plug an external USB keyboard to the laptop. You will see everything is running fine. If yes, then order a new keyboard.
GREAT VERY HELPFUL
wow its great and helpful tanx
You are welcome
You are most welcome , Have a nice day 🙂
Hello ….
My asus laptop model number A540l(Asus A540L) not install win7 ..
I am follow your all steps bt not work properly
I am boot sandisk pendrive and setup it but my drive was not load /show the drive at select or format time…
Thank you. Worked
great tutorial, only question i have will this work on the Asus A12 X555Q ? Please.