• Menu
  • Skip to right header navigation
  • Skip to primary navigation
  • Skip to secondary navigation
  • Skip to main content
  • Skip to primary sidebar

TrickiKnow Logo

Fixed Tech on the Internet

  • Blog
  • About US
  • Contact
  • Search
  •   Home
  •   Computer
  •   Laptop
  •    Mobile
  •   Raspberry Pi
  •   Softwares
  •   Gadgets
  •   About Us

Mobile Menu


  • Contact

  • Privacy Policy
  • Cookie Policy
  • Terms and Conditions
  •   Home
  •   Computer
    • Desktop Computer
    • Single Board Computer
  •   Laptop
  •   Mobile
    • iOS Devices
    • Android Mobiles
    • Tablets
    • Windows Mobile
  •   Raspberry Pi
  •   Software
    • WordPress
    • Applications
    • Internet
  •   Gadget
Home » Blog » Softwares » How to make a Windows 10 Bootable USB Drive (With Rufus)

How to make a Windows 10 Bootable USB Drive (With Rufus)

June 8, 2019 //  by Aamir Hussain//  4 Comments

FacebookTweetPinEmailShares21

How-to-Make-a-Windows-10-Bootable-USB-drive-2

How to make a Windows 10 Bootable USB Drive (With Rufus)

Learn how to make a windows 10 bootable USB drive or Pendrive with Rufus, step by step, and how to still use the drive for normal works after making it bootable. Yes, guys in this article I am going to show you the professional use of Rufus to make bootable media properly, to install windows 10 or Linux on your laptops and desktops. Also in single-board computers like Lattepanda alpha and another Mini computer that supports Windows or Linux.


So all you need a Microsoft media creation tool, Rufus setup from their websites. A USB drive of at least 4GB or more and a proper internet or WiFi connection on a PC. Before starting the process make sure to backup or copy any important files on a USB drive if have because all files will be deleted/formatted during the media creation. For a fresh start, you have to download the updated copy of the Microsoft Windows 10 ISO file (which is free of cost) see the steps below, or you can also use your windows DVD, as well as the process, is almost the same. Just follow the steps below:

Step 1: Download the Microsoft media creation tool from here: http://bit.ly/2XA0MGK

Step 2: Then also download Rufus setup: https://rufus.ie/

Step 3: Open up the media creation tool and click on the accept button.

Media Creation Tool Screenshot 1

Step 4: On the next page select create installation media and hit the next button.

Media Creation Tool Screenshot 2

Step 5: Then you have 2 options:

  • Download the windows 10 directly to the USB drive (it will download windows files to the USB drive and make it bootable, easy but it’s for 1 time)
  • Or you can download windows 10 ISO file to make a bootable USB for multiple (it has less chance of failure than the first option). Select ISO file and continue:

Media Creation Tool Screenshot 3

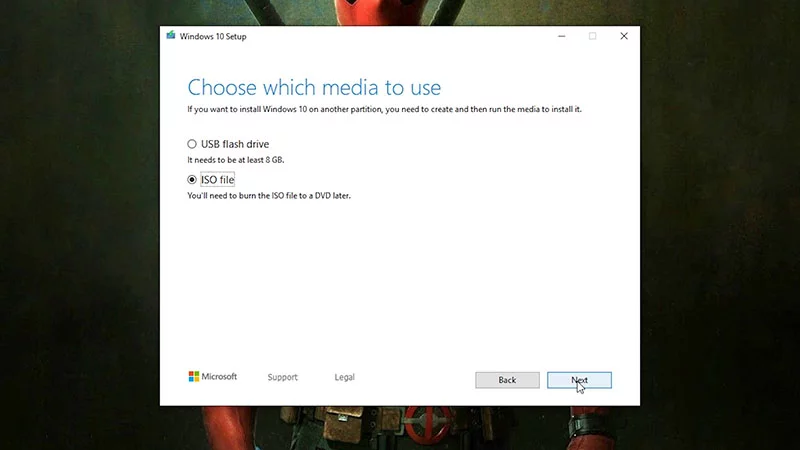
Step 6: Select the path to download the ISO file, then hit next it will take a few minutes to download the ISO, depending on your internet or WiFi speed.

Step 7: Finish the setup after downloading, then plug the USB drive into your PC.


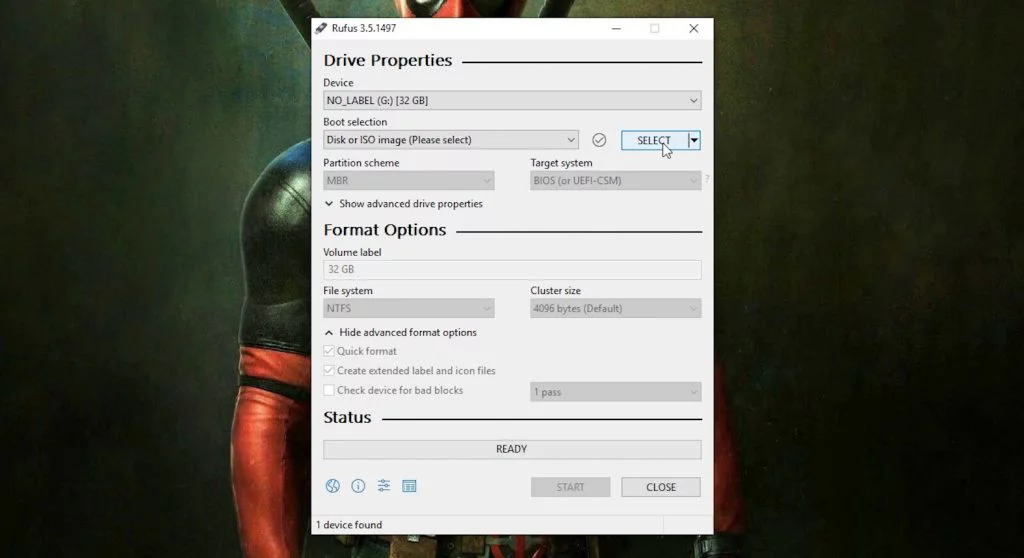
Step 8: Open up Rufus (its portable no need to install)

Step 9: Your USB drive will auto-detect in Rufus no need to select (if you have any other drive plugged in then make sure to select your USB drive on Rufus)

Rufus Steps Screenshot 1

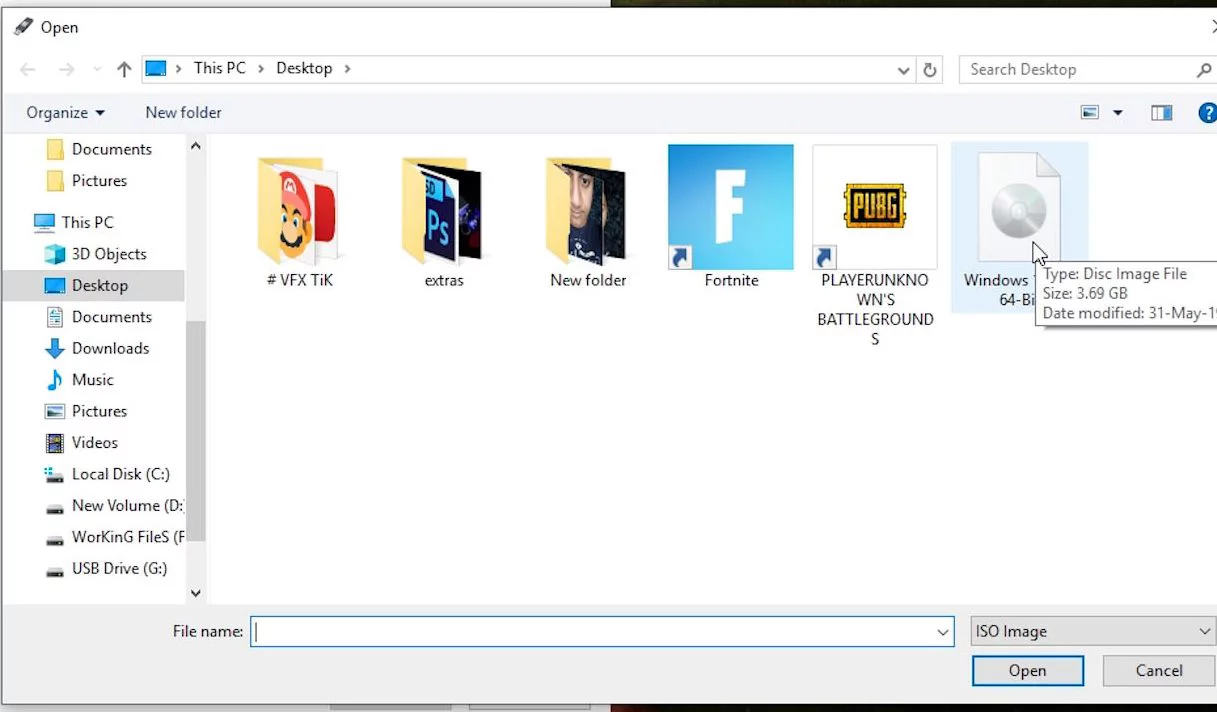
Step 10: Select ISO as Boot selection, just browse the path where you downloaded the ISO then Open it up.

Rufus Steps Screenshot 2 Rufus Steps Screenshot 3

Step 11: Now label your USB drive with any name, then in the file system select NTFS (why see down in this article)

Rufus Steps Screenshot 4

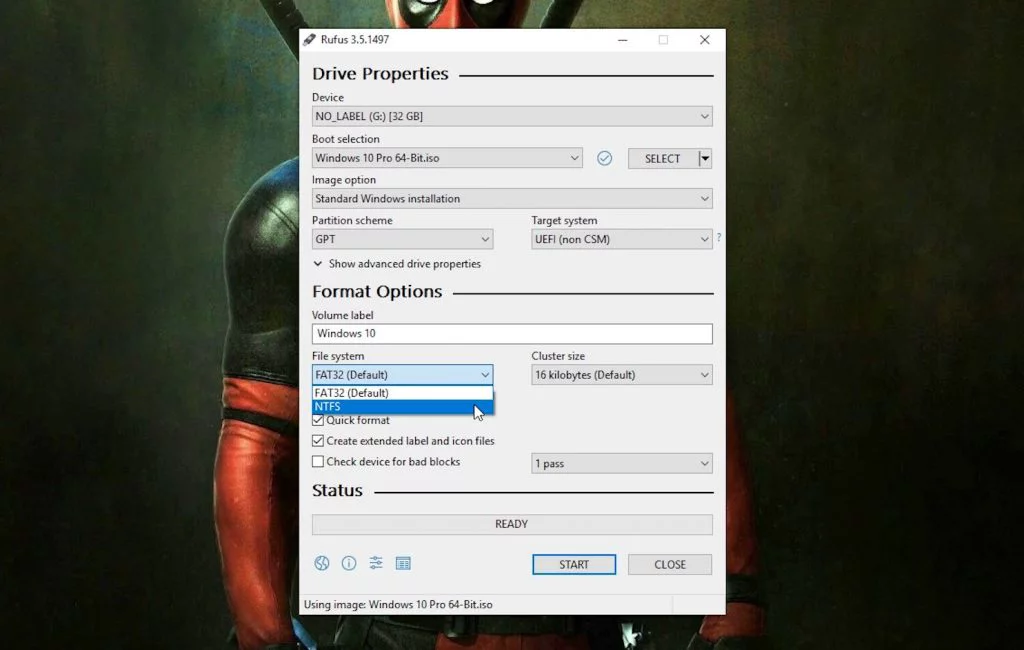
Step 12: Click the Start button to continue making Windows 10 bootable USB with Rufus.

Rufus Steps Screenshot 6

Congratulation !! you just created your bootable media, now you can install windows 10 to any supported computer. Pro tip hide the windows files inside the USB to use your drive as a normal flash drive. Hiding windows files helps to keep those files safe and now your media is bootable and you can use the rest of the space for your normal works.

Related Posts

  • How to make a Kali Linux Bootable USB Drive (3 Methods)

  • Windows 10 Bootable USB Flash Drive (With CMD)

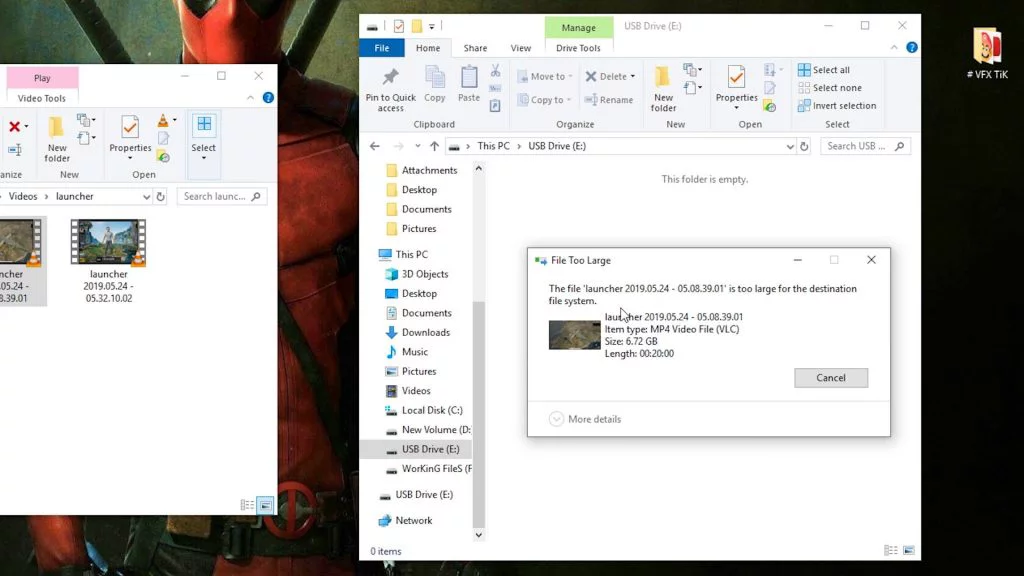
Why I selected NTFS for the file System ??

If you continue with the Fat32 then you will no longer be able to copy files to a USB drive which is larger than 4GB, you will get the following error dialog box saying:

Rufus NTFS Bootable USB
So make sure to select the NTFS file system in Rufus

How to install windows with a bootable USB drive ??

Step 1: Plug the bootable USB drive to your laptop or PC (make sure its turned off)

Step 2: Press the power button of your computer and then quickly press the boot menu key to open the boot menu.

Step 3: In the boot menu select USB drive and hit enter, Now you will see the Windows setup.

Note: Boot menu keys for all computers are not the same, see general boot menu keys below:

Lenovo: fn+f12 Asus Laptop: Esc Asus Desktop: f8 HP Laptop: f9 Dell Laptop: f12 Acer: ALT + F2 Toshiba: F12


Windows 10 bootable USB drive with Rufus (Video tutorial)

Thank you so much for watching how to make a windows 10 bootable USB drive with Rufus, hope my article and video helps you. If you still have any question please feel free to ask in the comment section, thank you again. Good luck with your windows installation.

Help your friends to make their own bootable Pendrive by sharing this tutorial 🙂

FacebookTweetPinEmailShares21

Category: Computer Hardware, Internet, SoftwaresTag: Bootable usb, flash drive, install, pendrive, rufus, Windows 10

Avatar for Aamir Hussain

About Aamir Hussain

Aamir Hussain is a full time YouTuber in a channel called trickiknow, he love computer tech and to share indeed myth of tech. Solving computer problems is one of the specialty of him. In this blog hop you will find some good geeks.

Related Posts

You may be interested in these posts from the same category.

Most-easy-ways-to-Convert-JPG-into-Word-Document

Most easy ways to Convert JPG into Word Document

This PC does not meet the minimum requirements Windows 11

This PC does not meet the minimum requirements Windows 11

How to Install VPN on Kodi (With Instructions)

How to Install VPN on Kodi (With Instructions)

How To Spy On Someone's Computer And Its Screen

How to Spy On Someone’s Computer Screen?

How to enable G-Sync on FreeSync monitor (with NVIDIA Card)

How to enable G-Sync on FreeSync monitor (with NVIDIA Card)

How to make a Kali Linux Bootable USB Drive (3 Methods)

How to make a Kali Linux Bootable USB Drive (3 Methods)

Top Keyloggers for Windows and Mac 2021 (Free Download)

Top Keyloggers for Windows and Mac 2021 (Free Download)

How to make a USB 3.0 External Harddrive from Laptop

How to make a USB 3.0 External Harddrive from Laptop

How to Install Windows 10 on Asus X540 Laptop from USB

How to Install Windows 10 on Asus X540 Laptop from USB

How to Install Windows 10 on HP Notebook 15 from USB

How to Install Windows 10 on HP Notebook 15 from USB

How to fix laptop keyboard not working (Windows 10)

How to fix laptop keyboard not working (Windows 10)

How to fix Lenovo Laptop Internet Problem (WiFi Not Working)

How to fix Lenovo Laptop Internet Problem (WiFi Not Working)

Previous Post: «How to Make Raspberry Pi Portable PC Make a Portable Office Computer with Raspberry Pi 3
Next Post: How to Get CCNA Routing and Switching Certification How to Get CCNA Routing and Switching Certification»

Reader Interactions

Comments

  1. Avatar for John BamideleJohn Bamidele

    March 27, 2020 at 6:26 am

    “A USB drive of at least 4GB”
    Thank you for the article. It appears Windows changed the minimum space requirement for creating bootable Windows10 disc. It is now “at least 8GB.” You may wish to update this article.

    Reply
    • Avatar for Aamir HussainAamir Hussain

      March 27, 2020 at 6:35 pm

      Yes if you download windows from the Microsoft media creation tool 🙂

      Reply
  2. Avatar for Muhammad ArsalanMuhammad Arsalan

    October 7, 2020 at 2:54 pm

    Nice Post, I like this post and it will be helpful for others, keep sharing!

    Reply
  3. Avatar for manjur alammanjur alam

    January 28, 2021 at 8:11 pm

    It is very better for everyone 8GB plus USB because 4 GB not affordable for this work. 16GB 32G use good for everyone. You can also put the same USB in another file.

    Reply

Leave a Reply Cancel reply

Your email address will not be published. Required fields are marked *

Primary Sidebar

Most Popular

External Graphics Card for Laptop – eGPU Setup Guide(1)

External Graphics Card for Laptop – eGPU Setup Guide

November 18, 2017

Enter Lenovo G50 Bios Setup & Boot Menu (With Images)(1)

Enter Lenovo G50 Bios Setup & Boot Menu (With Images)

May 11, 2016

How to Setup eGPU on Lenovo Laptop F

How to Setup eGPU on Lenovo Laptop – EXP GDC (NGFF Version)

March 23, 2019

Raspberry Pi 3 Complete Tutorial 2018 – Let’s Get Started N

Raspberry Pi 3 Complete Tutorial – Let’s Get Started

January 31, 2018

How to boot Asus laptop from USB

How to Boot Asus Laptop From USB Bootable Drive (F550)

December 26, 2016

Recent Post

Most-easy-ways-to-Convert-JPG-into-Word-Document

Most easy ways to Convert JPG into Word Document

January 26, 2022

This PC does not meet the minimum requirements Windows 11

This PC does not meet the minimum requirements Windows 11

January 3, 2022

How to Keep Your Laptop for Maximum Performance Article

How to Keep Your Laptop for Maximum Performance

December 15, 2021

How to Install VPN on Kodi (With Instructions)

How to Install VPN on Kodi (With Instructions)

August 10, 2021

How to install 7 inch touchscreen LCD on Raspberry Pi 4

How to install 7 inch touchscreen LCD on Raspberry Pi 4

May 28, 2021

  • Blog
  • Contact Us
  • About US
  • Privacy Policy
  • Cookie Policy
  • Terms and Conditions

Copyright © 2015–2022 trickiknow

This website uses cookies to improve your experience. We'll assume you're OK with this, but you can opt-out if you wish. Policy PageCookie settingsACCEPT
Privacy & Cookies Policy

Privacy Overview

This website uses cookies to improve your experience while you navigate through the website. Out of these cookies, the cookies that are categorized as necessary are stored on your browser as they are essential for the working of basic functionalities of the website. We also use third-party cookies that help us analyze and understand how you use this website. These cookies will be stored in your browser only with your consent. You also have the option to opt-out of these cookies. But opting out of some of these cookies may have an effect on your browsing experience.
Necessary
Always Enabled
Necessary cookies are absolutely essential for the website to function properly. This category only includes cookies that ensures basic functionalities and security features of the website. These cookies do not store any personal information.
Non-necessary
Any cookies that may not be particularly necessary for the website to function and is used specifically to collect user personal data via analytics, ads, other embedded contents are termed as non-necessary cookies. It is mandatory to procure user consent prior to running these cookies on your website.
SAVE & ACCEPT
Share this ArticleLike this article? Email it to a friend!

Email sent!