Lattepanda Alpha eGPU Setup With GTX 1650

Lattepanda Alpha eGPU Setup with GTX 1650
Hi, recently I found a way for installing Lattepanda Alpha eGPU (external graphics card) using an EXP GDC graphics card dock. I saw other people doing eGPU using the m.2 (m key) slot of lattepanda board and using an external hard drive on USB to store games. The problem is external HDD is slow to render the game files to the board.
So I installed an NVME SSD on Lattepanda on m.2 (m key) slot to store the OS and games. This gives very good results on game loading time and OS is also working fast now (i disabled the eMMC storage). Now I used the m.2 (e key) slot of the board to install eGPU on lattepanda alpha, all the instructions and item details are given below.
What items you need to setup eGPU on Lattepanda ??
There are some more methods around this topic, but I will share my best process. Basically you need an eGPU adapter (EXPGDC), desktop PSU, and a desktop graphics card. Which one ?? below is the list of my favorite combinations, which are cheap and best. You can go for high or low according to your budget.
I am using these 3 items to setup eGPU on Lattepanda Alpha.
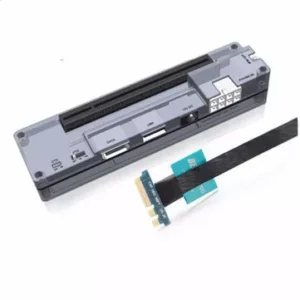
Exp GDC Dock (NGFF)
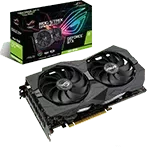
Asus ROG GTX 1650
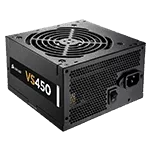
Corsair VS450 PSU
How to setup eGPU on the board (all steps)
So after you ordered all the required items from a local shop or online all you have to do open those boxes, with the Exp Gdc dock you will get a power connector and an NGFF to HDMI eGPU cable. The power supply unit comes with a power cable and the graphics card comes with the driver CD and accessories. Follow the steps below to install eGPU:
Step 1: Turn on the Lattepanda and press the ESC key to open Bios Setup.
Step 2: In the Bios go to Chipset tab > Graphics Configuration > Primary Display change it from Auto to SG mode.
Step 3: Now save the settings by pressing the f4 key on the keyboard then shut down.
Step 4: Plug the eGPU cable to the M.2 (e Key) slot and stick it with double side foam tape.
Step 5: Now get ready the eGPU power connector with the power supply unit. Connect the PSU 24-Pin connector with eGPU power 24-pin jack and 4-Pin CPU connector to the eGPU’s 4-PIN Jack. Just like the picture below:

Step 6: Now our power connector is ready and we have now 6-Pin output, Plug that output to the eGPU dock in power in socket and plug the eGPU cable (HDMI point) to the dock in the HDMI port. Just like the picture below:

Step 7: Now plug the Graphics Card to the Dock (if your card needs extra supplement power connector then plug the 6 or 8 Pin PCIe connector from the PSU).
Step 8: Then plug the lattepanda power adapter, power up the PSU, power up monitor, and plug the mouse and keyboard.
Step 9: Now the HDMI cable from the monitor will go to the GPU instead of HDMI in the Lattepanda.
Step 10: Here all Hardware setup is done, now turn on the lattepanda (GPU will also turn on automatically).
Step 11: When windows start, Go to the device manager you will find your new GPU in the Display adapter.
Step 12: Download and install the Graphics driver and Boom !! Your eGPU setup is Ready 🙂

Congratulations !! Now you can play heavy games or render videos on any editing software.
How to setup eGPU on Lattepanda Alpla (Video Tutorial)
Thanks for watching and reading our article on installing Lattepanda Alpha eGPU, hope this will help you a lot. If you have any questions regarding this project please feel free to ask in the comment section. Bye Bye take care, Have a Nice day.
Yes tish 800s model lattepanda no SG mode in bios.. help please
Yes 800s modell lattepanda no find sg mode in bios and buyed videocard and egpu dock. Sorry wrong english. Help please!
there is no SG in Bios of my LattePanda Alpha, any trick?
There is no SG option in Bios (only auto, IGFX, PEG) of my Latte Panda Alpha, any tricks on this?
There is a tiny PTD button in the eGPU adapter just along the HDMI port, try to switch it 🙂
how to fix black screen on fujitsu ah531
does exp gdc suport 1650s
ya why not